How To Keep Your Laminate Flooring Looking Like New
Prevent soiling and wear
Whilst laminate flooring can be cleaned with minimal effort, it’s even better to prevent it from being soiled and worn in the first place. Attach small felt glides to the legs of chairs, tables and other pieces of furniture that are frequently moved to avoid scratches and scuff marks. If you have swivelling chairs mounted on casters, make sure that the casters are of soft rubber (the kind sold for hard floors). Heavily used areas, like in front of desks, can also be protected with chair mats, which come in a variety of types and colours including transparent. It is also advisable to put a foot mat at the front door and lay dirt trapper barrier mats or runners in hallways.
If, despite all your precautions, your laminate suffers minor damage such as scratches, click here to learn how to fix it.
Sweeping, hoovering and wiping laminate floors
It’s easy to remove coarse debris or dirt such as sawdust from installing the floor using a soft broom or a hoover fitted with a suitable tool for hard floors. However, as sweeping tends to stir up dust, we recommend hoovering. To clean off residues and dirt that adhere to the floor, as well as marks left by rubber-soled shoes and furniture, wipe with a damp cloth.
It’s important that the cloth isn’t too wet; it should only be slightly moist so that the floor will quickly dry again afterwards. Too much water isn’t good for laminate. If anything ever spills on the floor, clean it up right away! Try to wipe lengthwise along the panels. There is no need for any additional treatment.
Suitable cleaning products for laminate flooring
Clear water is enough in most cases. If you want to use a cleaning agent, however, use one that is as mild and gentle as possible. Aggressive products will damage the laminate. Special laminate cleaners are suitable. Avoid products that contain wax or soap, as they leave unattractive streaks.
Ideal ambient conditions for laminate flooring
The best ambient conditions for laminate are a temperature of 20° to 22°C and relative humidity of 50-60%. A bit more or less than this isn’t a problem – these values naturally fluctuate in any case. But if the relative humidity persists at a significantly higher or lower level, we recommend purchasing a dehumidifier or humidifier as the case may be. Besides being good for the laminate, it also creates a healthier, more pleasant indoor climate.
Summary of how to care for laminate flooring:
Remove loose dirt and debris with a soft broom or hoover.
Use a moist cloth to clean off sticking residues.
Wipe parallel to the panels’ long sides.
Use a special-purpose laminate cleaner to get rid of stubborn dirt.
Place felt glides under furniture legs.
Use soft rubber chair casters.
Lay dirt trapper mats or runners at the front door and in hallways.
Tips for Keeping Your Laminate Floors Beautiful
Laminate flooring has become incredibly popular because it’s beautiful, durable, and fairly inexpensive. Like all floors, however, laminate requires a bit of special cleaning to keep it looking new and shiny. Laminate floors are not hard to keep clean, as long as you know the right way to do it.
Keep your shoes off.
This isn’t so much of a cleaning hack, as just a common sense rule. Put mats on both sides of every door, so that your outside shoes never come in contact with your laminate floor. Even if the bottom of your shoes look pretty clean to you, they will still leave behind dirt and sand.
Instead of floor mats, you could also consider using athletic flooring to limit contact between your shoes and floor mats. Venture Products foam flooring features Microban technology for an added layer of cleanliness protection and can be purchased in tiles for flexibility in any space.
Clean up spills immediately.
Use a dry, soft cloth to quickly wipe up liquid spills, or a slightly damp rag for non-liquids. Dry the spot thoroughly when you’re done, because any moisture, even water, that sits on the floor for an extended period can damage it by wearing down the protective layer.
Clean regularly.
Laminate floors are just like anything else – the more you keep on top of the cleaning, the easier it will be to keep them looking nice. Do a general clean at least once a week, and then a heavier and more thorough clean once a month. For your light cleaning, use either a vacuum with a soft brush attachment or a dusting mop. Make sure you never use a standard broom, because a lot of these have stiff, straw – like bristles that can damage the flooring over time. Also be sure to clean in the direction of the floorboards; this allows you to pick up bits of debris that have fallen in between the grooves of the pieces.
Quickie sponge mops featuring Microban protection works great as a cleaning tool for light, regular cleaning of laminate floors, and as a bonus, features the added benefit of remaining cleaner and fresher for longer.
Use laminate floor cleaner.
You can buy this at home improvement stores, and most large grocery chains. Follow the directions on the bottle, and then clean using a damp mop or cloth. Again, make sure that no moisture is left to sit on the flooring at any time.
Use hot water.
Hot water is considered to be one of the best ways to clean laminate flooring, because it doesn’t leave streaks. Fill a bucket up, plunge in your mop then wring it out until it’s just damp. Then thoroughly mop your floor and dry immediately with a clean cloth.
Use vinegar.
A vinegar and water solution can be a great way to clean laminate floors. Mix together one cup vinegar and one gallon water, then mop and dry as you would using the laminate floor cleaner or hot water.
Remove stains.
Laminate flooring can be stained with all kinds of things, but a list of the most commonly reported ones are blood, gum, soda, wine, crayon and ink marks, scuffs, and polish. Blood can be gotten out with window cleaner, and gum with a plastic knife. The soda, wine, crayon and ink marks can all be removed with a damp cloth. The heel marks and scuffs can simply be erased off with melamine foam (aka a Mr. Clean Magic Eraser.) You can use a bit of nail polish remover for the polish, but always be careful not to use too much since this can actually remove the finishing on the floor along with the stain. Spot test first!
There is no single educational route into becoming a great event planner. So when interviewing candidates, it’s better to start with a picture of the hard event planning skills you would be looking for. These might include a knowledge of logistics, vendor management and budgeting. You can also ask them about their knowledge of the events industry and look for current knowledge of specific terms or standards.
The best sets of event planner interview questions will also be vital to assess soft skills. What evidence is there of the candidates’ organizational and coordination skills? The best candidates will combine creativity and practicality with considerable patience and keen communication skills.
Since every event has different elements, situational questions are the best to assess the eligibility of an event planner. Find out if they have experience in managing large or small scale events as well as what type of events (corporate, social etc.). Try to understand their event management approaches as they describe past events, their successes and issues they faced. Look for the systems they employ to do their job; how they use technology and how they prioritize tasks.
It’s a good idea to provide candidates with a situation and ask them how they would handle it. This will help you evaluate the way they think; whether they rush to do things or are calculating and analytical. Event planning is a high-stress occupation, so dig into their stress management approaches.
Operational and Situational questions
What information would you ask for from a potential client? Why?
How would you choose the location/venue for an event? What are your priorities after choosing a location/venue?
How do you choose partners (e.g. caterers) when organizing an event? What are your criteria to assess their eligibility/quality?
Have you ever had to plan more than one event simultaneously? How did you do it? What was the result?
How do you use social media for your event planning or for attracting customers?
Describe a time when you went over budget. What went wrong and what did you do to fix it?
How would you manage stress as the date of an event draws near?
How would you react to technical problems during an event? What are the most common/serious problems you have encountered during an event and what did you do about them?
Describe a time when you provided a creative solution to a problem. What was the result?
Describe your most successful event planning experience. What did you do that made it so successful?
Describe an event management experience that didn’t have the results you aimed for. What happened and what did you learn?
Role-specific questions
How do you remain up-to-date with the event industry?
Do you know the most popular venues in X location? Why are they popular?
What do you know about DMS (Delegate Management System)? What is DDR etc.?
What technology/software do you use/prefer? What do you know about event technology?
How many events do you plan per year?
What types of events do you usually plan? Do you have a specialty? Why did you choose it?
What elements must be considered before you start planning an event?
How do you assess the success of each of your events?
What do you like most about your job? How do you stay motivated when things don’t go as planned?
How would you persuade a client of the value of your services?
Do you have any relevant working experience?
The truth is that no other job can prepare you completely for the work in event management. At the same time, however, given the complexity of the job, everything you did has at least somehow helped you to get ready for this position. You just have to find the connection.
Have you done anything in sales, or in customer service? You’ll use these skills as an event manager while talking to vendors, clients, suppliers and other bodies.
Have you ever worked as a financial analyst, accountant, or even an administrative clerk? Again, you will use the skills you learned in these positions, while budgeting and invoicing.
Show the interviewers that you understand the connection, and feel confident about your ability to handle the job.
What criteria would you consider when choosing a venue for an event?
There are many things you can, and should consider. First and foremost the size of the venue, and whether it can accommodate both attendees, and performers. Technical requirements comes hand in hand with it–a concert of a rock star requires different venue than a catering festival.
Second criteria are costs associated with renting the place, but also with transport of necessary equipment and people. It is important to mention this criteria, since a good event manager always tries to save money of their employer, and get the best possible deal.
Then we have many other, secondary factors, such as the mood/ambience of the place, the popularity in the target group, the quality of staff on site, location, accessibility, and parking space, additional services, etc.
Event Planner Job Interview Tips
Here are a few job tips to help you prepare for your job interview as an Event Planner. No matter what type of job you’re interviewing for, these tips will always be useful:
Research the company:
Spend a few hours to learn as much as you can about the organization you’re going to work for. Use resources such as their website, press releases, social networks (Linkedin, Facebook and Twitter). Understanding your prospective employer’s products, services, customers and competition will always give you an advantage when trying to answer interview questions. Also, the fact that you spent time researching the company, shows you’re interested in what they do and demonstrates initiative on your part.
Be prepared to answer why you’re the best candidate for the job:
Review the job description thoroughly and look for areas that are a good match with your qualifications and experience. Find at least three reasons that you think qualify you to be the right candidate for the job. Most employers will ask this question at some point in the interview. Even if they don’t, you always have the opportunity to speak about this when you’re answering other questions.
Build confidence by practice:
Set aside an hour or two with a friend, relative or colleague to help you through a mock interview. Make sure they ask the tough questions. Ask for their feedback on how you responded, your body language and what you could improve. It’s always an advantage to have tough questions asked by someone friendly to build your confidence before the actual interview.
Always ask questions at the interview:
Prepare a list of questions that you want to ask your prospective employer. Not only does this demonstrate your enthusiasm to learn more about the job and company, but gives you useful insights into the organization, as well. Here’s a list of questions to get you started:
What are the three key things you’re looking for in this position?
If I get the job, what will make me successful?
Who are the other people I will be working with?
How would you describe the company’s culture?
What are the main challenges in this job?
What are the key accomplishments you’d like to see in this job over the next year?
Other questions you may get in your interview in event planning and management
How do you manage stress on the day of the event?
Imagine that a lighting system failed during an event, and everyone stayed in the dark. What would you do?
Describe a conflict you had with someone (client, colleague in your last job, etc), and how did you handle it.
Describe a time when you struggled to build a relationship with someone important. How did you eventually overcome that?
Tell us about a situation when you were under pressure in work.
Describe a situation when you had to motivate someone in work (your colleague, your subordinate).
What are your salary expectations?
Why should we hire you, and not one of the other candidates for this job?
All of the Questions to Ask Potential Wedding Planners
Your wedding day is an extremely personal event. After all, it’s about celebrating you and your partner’s love. So it makes sense that you’d want to hire a professional wedding planner you really like. To make the process easier, we’ve compiled the most important questions to ask your wedding plannerbefore hiring them.
With everything from basic questions (are they available on your wedding date, for example) to pre- and post-wedding logistics, we’ve got you covered. Before you decide to hire a planning pro, it’s important to thoroughly vet them to ensure that they’re the right fit for you and your partner.
With that in mind, here are some key questions to ask a wedding planner (and what you should listen for in their answers).
Basics
1. Are you available on my wedding date?
Why you want to know: When it comes to questions to ask a wedding planner, this should be your first.You don’t want to waste your time (or theirs) if they’re not free on the chosen date. If your wedding date is still flexible and you’d be willing to wait to work with someone you really love, ask for a few options so you can take them into consideration when you’re finalizing your timeline.
2. What sorts of services do you offer (month-of coordination, full-service planning, or à la carte planning)?
Why you want to know: It’s not always clear from their website what their services are, so it’s good to ask for a thorough explanation of the types of ways they can help you with your wedding planning. This information will make it easier to decide what type of planner would be best for you. For example, if you’re super-organized and have time to follow up with pros yourself, then you may only need someone for a coordination role. But if you’re planning a destination wedding, it may be best to work with a full-time planner who can manage the logistics for you.
3. How many meetings will we have, and how will we be involved?
Why you want to know: This is when you should get an outline of what the wedding planning process would look like. Some planners will email you sketches and follow up over the phone, while others may create online inspiration boards and will verbally walk you through swatches and sample designs in person. Certain planners will ask you about each and every detail while others wait and fill you in on everything all at once. There’s no right workflow—it’s all about what you like best.
4. Do you handle professional services, contracts and payment processing?
Why you want to know: The answer to this question should help you get a sense of how other vendors will be handled throughout the planning process. It’s a good idea to figure out how they prefer to work ahead of time.Some planners request a lump sum and then will hire and pay pros for you.
5. Can you walk us through the process of selecting other vendors and how we would be involved?
Why you want to know: You want to make sure you have the best team with you on your wedding day, so it’s important to understand your planner’s selection process. Professional wedding planners often spend time cultivating relationships with other wedding pros, so you’ll be exposed to their already-built network You’ll also want to make sure they’re sending the best people for the job your way. During the meeting, jot down some names of professionals they prefer to work with so you can do your own research.
6. How many people on your staff will be at the wedding?
Why you want to know: Find out how many assistants, coordinators and event stylists your planner will bring on the day of, so you can rest assured that everything will be handled. The final size of the day-of team depends on your wedding’s specific logistics, but they should tell you the number of staff members needed for the typical wedding they work on.
has been providing customers with reliable and professional long distance moving services for more than 90 years. For close to a century of perfecting the interstate moving process (from quote to move-in day), we understand what customers need in order to have a great moving experience. We strive to provide customers everything they need for a successful move, including allowing you to build your own move plan, complete with customizable service options that meet your needs, budget and schedule. We also include our basic Full Value Protection option in every initial moving quote.
Full Packing Services
For some, packing may be the most overwhelming part of the move! Eliminate stress and save time with our full packing service option. No matter the size or destination, our packing crews can take care of this task, so you don’t have to.
Partial Packing Services
During your custom quote estimate process, will get a deeper understanding of exactly what you want to move. We will assess which rooms and items you plan to pack yourself and how we may assist in the packing process.
Unpacking Services
Unpacking tends to take longer than planned, or it becomes one more stressful thing to add to the list. can help you get organized with our unpacking services that allow you to focus on more important things like settling into your new home.
Custom Crating Services
If you have fragile items in your home, you may need them to be secured and custom crated before our movers load these items onto the moving truck. can arrange for custom crating services for specialty goods such as large mirrors, valuable artwork, glass tabletops, antiques and more.
LONG-DISTANCE MOVING
LARGE AND SMALL LONG-DISTANCE MOVING COMPANY EXPERTISE AND AUTHORITY
Ask any cross-country or long-distance mover you speak to if they have complete operating authority. Long-distance moving is a different ball game than local moves. Now, we’ve simplified cross-country moves with our fast moving service
There are many requirements for long-distance movers that are designed for your protection and quality of service.
DOOR TO DOOR TO NEARLY ANYWHERE – INTERNATIONAL MOVERS
Looking for an international mover? provide the exact same quality of service whether your moving to another state or moving to another continent.
accepts payment for moving services by cash, check or credit card. accepts your cashier’s check, traveler’s check, bank check or personal check. You may choose to pay at origin or destination
HOW DO I PAY ATLAS BY CHECK?
Here are a few things to keep in mind if you wish to pay by check:
You may pay with either a business or personal check.
The check should be made payable
Write payment for the exact amount of purchase, not to exceed $40,000.
You may write checks on more than one account, provided the combined total does not exceed $40,000.
THANK YOU FOR PLACING YOUR TRUST
dedicated to making your move pleasant and stress-free. Our flexible payment options are designed to make paying for moving services as convenient as possible for you. Our goal is always your total satisfaction. If you have any questions
How Much Does It Cost To Move Out Of State?
Long-Distance Movers Cost
Moving out of state costs $4,318 on average, with a typical range of $2,423 and $6,213. The total depends on the size of the load, what you’re taking and how far you need to go. Short trips run $700 to $5,000, while larger or longer distances cost $4,000 to $10,000 or more.
Moving long distance is exciting, but it’s also pretty labor intensive. Furniture is heavy. Wood and upholstery needs protection from damage, and there is no “easy” way to transport a king-size mattress. As you plan, think about these price factors to help you choose the best service for your needs.
Cost to Move to Another State
Moving to a nearby state costs most homeowners $700 to $5,000. Since price is related to weight and distance, going to a location 200 to 300 miles away may run half as much as driving 1,000 or more miles. In some cases, you might qualify for local estimates.
Average Cost of Moving Cross Country
The cost to move across the entire country ranges from $4,000 to $10,000 or more, compared to the cost of moving between states that averages $4,318. The price you pay depends on:
size and number of trucks.
total weight (avg. of 7,500 pounds for a 3 bedroom house).
services you request (packing, unloading).
whether you choose a full service company, truck rental or shipping container.
Full service moving companies charge the most because they handle loading, unloading and transport. Renting a truck or a shipping container run less because you’re responsible for packing and loading.
Tips for a Stress-Free Long Distance Move
Moving is a major life event, and a long distance move is even more momentous. To make the process as smooth and stress-free as possible, you need to have a plan and stay on top of it. Here are our tips to help you feel confident, calm, and prepared.
Plan ahead
Yes, this tip is pretty obvious, but the more you plan out and in greater detail the better. Start as early as possible. Many people doing a long distance move have every intention of following a move plan — until time gets away from them and it’s too late. To get started:
Make a folder (physical and/or digital) for your move and keep all your lists, receipts, quotes, and other paperwork there.
Create a list (or use our moving checklist and add on to it!) of all the things you need to do for your move and when they should be completed by.
Keep all pertinent contact information in your move folder, such as your moving company, your realtor, etc.
Make decisions about what you will handle yourself and what you will use a professional service provider for.
Research moving companies
Unless it is absolutely not in your budget, hiring professional movers is your best bet when moving — especially long distance. You will be handling so many details that anything you can get off your plate should be delegated elsewhere.
Downsize
You don’t want to spend time and money moving things that you don’t need or want across the state or the country. Moving is a great time to go through your possessions and sell, donate, gift, recycle, or throw away items that no longer serve a purpose. Carefully consider what items should make the move with you. Here are a few questions to ask yourself:
Am I moving to a different climate where I may not need some seasonal items such as a snowblower or winter coat?
Are there items I’ve been holding on to “just in case” I one day need them or can make use of them again?
Are there things in storage that I haven’t even looked at in a year or more (let alone used)?
Pack like a pro
We probably all remember at least one moving experience that was, to put it lightly, less than organized. Maybe it was from a college dorm to your first apartment or to a new apartment after a roommate abruptly backed out. The memory of grabbing whatever was nearby and shoving it unwrapped into any bag or box before cramming it all into a friend’s pickup is one most of us would prefer not to relive.
How to Guide to Packing & Moving for Your Long Distance Move
Long-distance relocation is a life-changing prospect. Whether your move was a sudden decision because of a job or a process that’s been in the works for years, it’s finally time to prepare for the big move. Use this complete guide to moving and packing for long-distance moves to cover all your bases and ensure a hassle-free moving experience. Concentrate on your exciting, new life in your new location and leave much of the stress and exertion of moving to a qualified team of professionals.
Here are the basic steps to long-distance moving:
Create a list
Downsize
Gather packing materials
Work with a moving company
Pack your belongings
Create a List
Long-distance moving is not a project you can afford to procrastinate on. In order to be sure all your bases are covered, a list is essential. Once you have a basic list of the steps you need to take to prepare for your move, break it down into further sections and put them on the calendar
Downsize
Renters and homeowners alike typically have too many possessions. Even if you use the most affordable moving service or move your own items, you’re still spending time and money transporting items from one place to the next. Follow these steps to evaluate your belongings and use this chance to clear unused and unusable items from your possession.
Organize
Take a few hours or days to go through all your belongings. Before you start packaging things, it’s important to know what you have. Organize closets, kitchen cupboards and other storage areas. You may be surprised at the amount of duplicate items you have or the amount of clothing you have that you no longer wear.
Regardless of your approach to the divorce process, collaborative or otherwise, this process impacts the remainder of your life and, if you have children, their lives and their future relationships. Choose carefully. Choose wisely. And remember…
You are making this choice in the midst of very strong emotions, whether they be rage or fear, catatonic depression or the elation of hoped-for utopian freedom. These emotions can lead to grasping desperately and blindly at the first lifeline you encounter or buying into a strategy which does not serve you, your estate, your future or your children’s future well.
The choice requires patience, in-depth interviewing and most of all, it requires a “fit.” As you are careful about your choice of a dentist, or the medical doctor who will handle your most intimate medical problems or your mental health therapist, you must be careful in the selection of an attorney for if you and your divorce lawyer don’t fit well together, the results will be disappointing at best and catastrophic at worst.
Interview more than one lawyer in whatever methodology you choose to operate – collaborative or otherwise. Yes, this will cost you a bit of money, but this is the rest of your life we are talking about here.
Make a list of things you think you know about the divorce process as well as the things you have questions about. Then pose questions about how this attorney would go about teaching you about the process, the potential outcomes, and their impact on your and your children’s future.
Look for the “fit”! – the shared philosophy, vision, emotional support, ability to make the complex things simple for you. We all communicate differently and communication is the key.
REMEMBER: You are NOT hiring a best friend. You are hiring someone to shepherd you through an almost incomprehensible maze at a time when you are at your most vulnerable and while you are less able to learn and adapt quickly than you have ever been before. This person must be able to tell you the truth when s/he knows you will not like it and will likely fight against it. Choose carefully!
Steps To Take For Choosing The Right Divorce Lawyer.
1. Be Realistic
Don’t confuse your divorce lawyer with your therapist. A divorce lawyer’s primary role is to give you legal counsel and provide the advice and support you need to resolve your divorce. Keep in mind that you are paying for a specific service and that you should make the most out of your time with your divorce lawyer. Don’t expect a divorce lawyer to solve every single one of your problems with your soon to be ex-spouse. By taking a realistic approach, you will be able to make the right choice on your divorce lawyer.
2. Look Out for Red Flags
When you are evaluating your options for divorce lawyers, make sure to look out for any red flags. Common red flags for divorce lawyers include bad communications, promising guarantees, and not treating your case with the personal attention that you deserve. When it comes to choosing the right divorce lawyer, you should always listen to your instincts. If you feel like a certain divorce lawyer candidate isn’t giving you what you need, you should walk away. It’s always a good rule of thumb to interview at least 3 different divorce lawyers before you make your final decision.
3. Decide on Whether Traditional Litigation Will Work for You
When you are looking for a great divorce lawyer, you should try to decide on whether or not you want to go the route of traditional litigation. If not, you should try to find a divorce lawyer with experience in divorce mediation or other collaborative divorce options. The lesson to be learned here is that you want someone with the experience you need. Lawyers specialize in all kinds of matters, which is why you should figure out what the best route to go for your divorce is before you hire a certain divorce lawyer.
4. Stay Focused
It’s easy to let your emotions control your decisions when you are getting a divorce. The important thing to do is stay focused on the bigger picture when you are choosing a divorce lawyer. Keeping a level head will help you choose a great divorce lawyer and get on with the proceedings. Remember to reach out to The Johnson Law Firm and Associates to hire the best divorce lawyers possible.
Things to Know Before You Decide to Divorce
The decision to separate and divorce from your spouse can be one of the most stressful and pain-staking decisions you will ever make. Feelings of uncertainty, sorrow, grieving, denial, and guilt can paralyze you, and make you feel stuck. While there is no easy way to make this very difficult decision, preparing yourself for the emotions that lie ahead of you may help ease the burden when the time comes to have The Talk with your partner. Knowing what to expect when you and your spouse decide to end the marriage can also make this time a little less difficult.
1. Fear
You will be afraid to call it quits because you don’t know what lies ahead of you. You may be scared of the Unknown and because of this, you may tell yourself that you are comfortable even if you are miserable. You will will try to weigh the pros and cons of staying married, and tell yourself you can continue to endure your unhappy marriage. You will tell yourself lies and reason that you should stay together for the kids, for the finances, etc. But fact that you’re trying to bargain against your happiness indicates that something is wrong. You are bargaining because you are scared, but know that this is normal.
2. Insanity
Know that when the decision is make to split, the roller coaster of emotions you will feel is unlike anything you have ever experienced. Grief, pain, relief, heartbreak, confusion, and the desperation of wanting to be loved can feel like waking up every morning and learning that you are the only survivor to a nuclear war. Do not hide these emotions, but accept them and deal with them in a healthy manner. And once you do, know that there is a weight that will slowly start to ease from your shoulders—the same weight that you denied all this time when you told yourself nothing was wrong.
3. Desperation
Even if your self-esteem was in the dumps from your martial troubles prior to the split, know that it will shatter once the separation occurs. You may find yourself wanting to be loved and validated, desperate for attention that your spouse no longer provided. You will think that nobody will ever love you or want you again, and you may be tempted to to date immediately and latch on to the first person who catches your eye. Resist this urge to attach yourself, even if you have not had that romantic touch or intimacy for a long time. Trying to fill that void with another relationship robs you of the chance to heal, and may set into motion a cycle of dependency for you, when what you need is to be strong and focus on loving yourself.
Being Reactive
You will be tempted to make decisions driven by emotion, rather than logic. You will constantly forget that divorce, boiled down, is a business transaction–a splitting of assets and incomes. The logical part of you will understand this, but the part of you that is hurt may spend months fighting over things that have nothing to do with money at all. During the legal process, you will be forced to choose your battles. Choose wisely. You will need to learn that nobody wins in divorce. Otherwise, you will find yourself robbed of years of your life fighting in court, having spent tens of thousands of dollars on legal fees that could have been put to better use in your post-divorce life, and so emotionally distraught that moving on will be extremely difficult.
Discomfort
You will find yourself in new uncomfortable situations. There are too many to mention here. You may be re-entering the workforce. Your budget may be tight. Your children may have trouble adjusting and exhibit behavioral problems. You may find friends treating you differently, thinking for some reason your split means that their relationship is in jeopardy. Social situations where there are couples may make you feel lonely and miserable. Understand that you are not alone in all of these struggles and that there are infinite resources are out there to help you. Do not allow any of this discomfort to make you bitter.
Denial
You may tell yourself that you are find and holding up well, but do not mistake that complacency with merely bootleg up your emotions. You will need a support system: a therapist, a support group, good friends, the non-judgmental anonymity of online forums. Whatever combination of systems you choose should help you attain two objectives–creating a safe place for venting, while also helping you find constructive ways to cope with the divorce in a healthy manner. Do not convince yourself that you are better than that, stronger than that. You are human. Go talk to someone.
Empowerment, if you let it
You will learn that divorce gives you a choice. You can choose to look at this split as a trauma from which you will never recover, and to be guided by anger and fear and and panic, or you can choose the path that takes more work–the path where you ask for assistance, get the support you need, educate yourself about every aspect of the divorce (and there are many), and understand that you will have the power to get through it all. No one can make that choice but you.
Guidelines to basic electrical wiring in your home and similar locations
Electrical wiring and symbols
Electrical symbols are used on home electrical wiring plans in order to show the location, control point(s), and type of electrical devices required at those locations. These symbols, which are drawn on top of the floor plan, show lighting outlets, receptacle outlets, special purpose outlets, fan outlets and switches
Dashed lines are drawn between the symbols to denote which switches control specific lights or receptacles. There are quite a few symbols used to represent the devices used in home electrical wiring but some of them are very similar
An “outlet” is any point in an electrical system where current is taken out of the system in order to supply power to the attached electrical equipment. An outlet can be one of two basic types: A “Receptacle” outlet or a “Lighting” outlet.
A receptacle outlet is one in which one or more receptacles are installed for the purpose of attaching “plug and cord-connected” type devices, and a lighting outlet is one intended for a direct-wired connection to a lamp holder, luminaire (lighting fixture) or ceiling fan.
How electricity travels throughout the home?
Electricity is supplied to your home through your electric utility’s overhead or buried power lines. Before entering your home, electricity passes through a watt-hour meter which measures the amount of electricity used.
LEARN THE BASICS OF HOME ELECTRICAL WIRING
Electrical wiring can be tricky—especially for the novice. That’s why it’s usually best to hire a professional for anything other than a simple job. Otherwise, you could risk injury, damage or fire. If you do plan to complete a DIY project that has an electrical component, there are some basic things to know about wiring installation.
Understanding electrical wiring
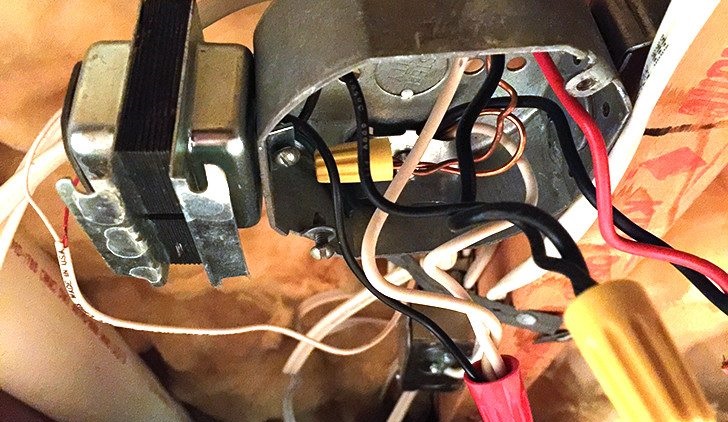
Since the 1940s, any house built (or any older home that has been rewired) has had to follow an electrical code: the NEC—written with safety in mind. NEC code identifies types of electrical wires and electrical cable types by color. When you remove a switch plate, you’ve probably noticed yellow, white, black, red or green wires. They are not there to be decorative; each serves a specific purpose, and some don’t play nicely with others.
How to Connect electrical wires
When you’re doing wiring installation, you need to identify the parts of the wiring cable, the non-metallic electrical cable: the outer sheathing (the jacket) and the inner wires. The colored “wire” you see—the green, black, red, blue or white—is actually the sheathing that covers the inner copper wires. If you look closely, you’ll see markings stamped on the sheathing to let you know the number and gauge of wires inside. The color of the sheathing lets you know what each wire does.
The following is sort of an electrical wire types chart:
Black wires or “hot wires” carry live electrical loads from the electrical service panel to an outlet, light or other destination.
Red wires are also hot wires used to interconnect smoke detectors, so that if one alarm goes off, all the others do as well.
White and gray wires are neutral wires that connect to the neutral bus bar, which attracts current and carries it throughout the house. Don’t let the “neutral” part fool you because they can still carry a charge—especially if the current load is not balanced.
White wires wrapped in black or red electrical tape are also hot wires. The tape just lets you know that the white wire, which is normally neutral, is being used as a hot wire instead.
Green wires connect the grounding terminal in an outlet box and run it to a ground bus bar in the electrical panel, giving current a place to escape to the ground in the event a live wire touches metal or another conductor. Green wires can only connect to other green wires but can still be live if the electrical system is faulty.
Bare copper wires are the most common type of grounding wires.
Blue and yellow wires, although not usually found in non-metallic (NM) cable, are sometimes used as hot wires in an electrical conduit. The blue ones are travelers that might be in the switches at both the top and bottom of a staircase to control the same light.
What type of wire is used for residential?
Most modern homes use nonmetallic (NM) cable that consists of two or more wires wrapped inside the colored sheathing mentioned previously. The package of wires usually contains one or more hot wires plus a neutral and a ground. To accommodate wiring in an older home or if your wiring just needs work, you can splice the old wires with new NM cable using a junction box that protects wire connections. The larger circuit wires carry circuit voltage that can be really dangerous to touch. If you don’t know what kind of wires you have, consider them all to be dangerous.
How to Rough-In Electrical Wiring
You can save a lot of money by doing your own wiring. Here we’ll show you to wire an entire room. Even if you’ve never picked up an electrical tool in your life, you can safely rough-in wiring by following the directions in this article. You’ll learn all of the pro techniques for a wiring job, including choosing the right size receptacle boxes, running cable throughout the room, and making the electrical connections.
Tools Required
Drill/driver – cordless
Hammer
Tape measure
Plastic boxes and flexible nonmetallic cable (commonly called Romex) put electrical wiring projects within the skill range of every dedicated DIYer. In this article, we’ll show you some house wiring basics—how to position outlet and switch boxes and run the electrical cable between them. We won’t cover many other house wiring details. For help with circuit design and making connections to your main electrical panel, we recommend you consult a licensed electrician.
Electrical house wiring mistakes can be deadly, so make sure you obtain a permit from your local building department and have an electrical rough-in inspection scheduled with a building official when you’re finished. Draw a sketch of your room that shows lighting, switch and outlet locations. Review your plan with the inspector and ask whether there are any special requirements.
Mark the Box Locations
Measure and mark the center of each box.
Mark the height from the floor to the center of the boxes (usually 48 in. for switches and 12 in. for outlets) or line them up with existing boxes to determine electrical outlet height.
Use letters and symbols to identify boxes.
Add 2×4 blocks to position boxes away from wide window and door trim
Basic Residential Electrical Wiring Rough In and Codes Guide
What are the basic residential wiring circuits? Can you put the hall plug on the same breaker as the dining room? How many switches have to be in the stairwell? What size wire do you use for a dryer? How many amps can 12-2-WG take? All of these questions are answered somewhere in the 700 (more or less) pages of the National Electric Code. Luckily many of the most common residential wiring questions are answered right here on just a couple of pages.
Are You Qualified?
This article is not intended to be a complete guide on the subject of residential wiring, but only an aid to those who already have some knowledge on the subject. I am not encouraging people with little or no experience to tackle a large wiring project (like wiring an entire house), and if that is your intent, then this is just the beginning of the information that you will need to safely and effectively accomplish such a task. There are many excellent guides available in print if you need more information.
Disclaimer: Incompetent or improper wiring work can result in loss of life limb and property. Wiring which is not properly inspected may void your homeowners insurance. In some areas it is not legal for anyone other than a licensed electrician to do wiring work at all. I am not a codes official. I am also not an expert on electrical wiring. I’m just a guy with some practical experience building and wiring houses. Furthermore, the code changes on a regular basis and is subject to local jurisdictions. If you are going to do electrical wiring, you should become educated about the code as it applies in your area.
Service Equipment
The Service equipment (main panel, entrance conductors, meter base, and associated hardware) must be adequate to safely supply the required load. If you haven’t already done so, you can use my Free Load Calculator to determine the size that you will need.
The main service equipment panel shall be mounted either outside or inside the dwelling at the point of entrance of the service conductors to the building. All service equipment and electrical panels shall have a clear area 30″ wide and 36″ deep in front. This clear area must extend from floor to ceiling with no intrusions from other equipment, cabinets, counters, appliances, pipes, etc. Panels are NOT allowed in clothes closets or bathrooms.
Wiring a House
Wiring a house or a basement in a house is something many do-it-yourselfers can tackle. It does require some basic electrical understanding and knowledge of electrical codes but if you have a little of this background you can make it happen. This website is intended to give some guidance for your wiring projects starting with the topics listed below. The frequently asked questions section is also a nice resource for some of the more common DIY electrical questions.
Wire 3 way Switches and other Wiring Diagrams
Below are some of the most common wiring diagrams you will encounter in your home for outlets, switches, and major appliances. Wiring 3 way switches seems to be the most popular topic so I’ve included lots of diagrams for those. Three-way switches allow you to control lights or receptacles from two points. These are commonly used for lighting in a stairway where you want a switch on each floor entering the stairway. Three-way switches are also common in hallways, garages, and kitchens.
Four-way switches are very similar in design to three-ways and are used to control lights or receptacles from three or more switch locations.
AWG stands for “American Wire Gauge” and is a standardized wire gauge system used in the US since 1857 for diameters of round, nonferrous, electrically conducting wire. The cross-sectional area of a wire determines it’s resistance and current-carrying capacity. The large the wire diameter, the less resistance it has to the flow of electrons, and the more current it can carry without overheating
your review of the newly-constructed facility, the greater the chance that you can find problems which the builder can fix before you move in
Home Completion Starts the Inspections
When the builder feels that a home is completed, they contact the city and have the city inspectors complete their final inspections. When the city has signed off on the home, the builder is ready for you to do a “walk through.” This is the time when the builder meets the homeowner at the new home and “walks” the homeowner through the home allowing the homeowner to inspect the home.
Just because the home passed the city inspections doesn’t mean that everything is perfect. After the contractors have completed their portion of the building job, the city inspectors verify that the building is built within code. The city inspectors do not inspect for cosmetic flaws nor do they inspect for functional issues such as a leaky faucet or scratched floor. It is not uncommon for a new home to have 10 to 30 items that need attention by the builder.
Tips for a Successful Walk Through
Put it in writing: Don’t rely on the builder’s representative to make your list. Make your own list of items that you want to have fixed. Mail your list to the builder using certified mail. Be sure to get a proof of delivery to the builder. You will be glad you took the extra time to prepare your list and track the delivery if there is a dispute later with the builder about what they needed to fix.
Take your time: Don’t feel that you need to rush through your walk through. If the builder’s representative tells you that he or she only has an hour, you can still take as much time as you need and mail your written comments to the builder.
Schedule wisely: Allow a three to seven days between the home inspection and the closing in case the builder needs time to fix issues that were identified during the home inspection.
Insist on issues being fixed: Don’t close on the purchase of the home until the issues are fixed. Once you close on the house, the builder may not be motivated to move quickly to complete the items on your check list.
Making a New Home Inspection Checklist
Every home is different, but many houses have the same potential issues. A builder may give you a new home inspection checklist to use during your walk through. You can use their list or download a free home inspection checklist of your own
Be sure the check list you use includes the following items:
Heating and Cooling
Turn on the heater and listen to it go on.
Check that air is coming out of all the vents or check if radiators or convectors are getting warm to the touch.
Turn up the thermostat at least five degrees over room temperature. Make sure the heater continues to run and then shuts off.
Turn on the air conditioner and listen to it go on.
Check that cool air is coming out of all the vents.
Turn down the thermostat at least five degrees under room temperature. Make sure the air conditioner continues to run and then shuts off.
Electrical
Inspect each light fixture to make sure it is fully-installed and that there are no broken parts to the fixture.
Turn on each light switch and fixture to test that it works correctly.
Plug a radio into each electrical outlet to be sure that the outlet functions.
Test the doorbell.
Plumbing
Check every faucet to make they turn on and off easily.
Run every fixture for five minutes. Check for leaks from the base of the fixture and drips from the faucet.
Kitchen
Check countertops for scratches and abrasions.
Inspect the front of each cabinet for a smooth finish.
Open every cabinet. Look for sturdy hinges and hardware.
Pull out every drawer as far as possible. Be sure each drawer pulls in and out smoothly.
Turn on each appliance and make sure that it functions correctly.
Bath
Inspect the bathtub, shower, sink and toilet for chips and cracks.
Close the bathtub and sink stopper. Add a couple of inches of water. Wait two to three minutes to be sure the stopper does not leak.
Flush every toilet. Check for leaks around the base of the toilet.
Sit on the toilet to make sure it is securely fastened to the floor.
Windows
Check glass to make sure there are no cracks.
Open every window to its fullest and then close it tight. Hold a lit match or lighter around the edges of the window. A flickering flame will signal an air leak.
Check each for sturdy hinges and hardware.
Be sure there is a screen tightly installed on every window. Look for holes or tears in the screen.
Doors
Open and close all doors to their fullest and then close. Look for a smooth operation of the hinge with no dragging at the bottom of the door.
Make sure all sides of the door are painted, including the tops, bottoms and edges.
Lock and unlock every door. Look for a smooth operation of the lock with no binding.
Check the threshold under every door to be sure there is no open space under the door.
Walls, Floors and Ceilings
Check the finish for the desired level of smoothness.
Check drywall for visible seams or nail heads.
Confirm that paint and varnish colors are correct.
Check floor and ceiling moldings. Look for a smooth finish with no protruding nail heads. Check for gaps that may need caulking.
Look for broken, chipped or cracked floor and wall tiles. Check for missing grout.
Look for scuff marks on hardwood, tile and linoleum flooring.
Check carpeted areas. Look for loose fitting carpet at the edges or in the middle of the room.
Porches and Decks
Check the sturdiness of the construction.
Be sure that there are no exposed nails or screws.
Garage Door
Open and close the door. Be sure the door opens and closes completely.
If there is an automatic garage door opener, test the door from the wall switch and the remote control openers. Open the door halfway and then quickly stop the opening. Place a small item like a bucket under the open door and then close the door to test the reversing device. Be sure that the light bulb in the automatic door opener is functioning.
Basement and Attic
Check the walls for cracks and water damage.
Check attic ventilation system. Manually turn any fans or blades.
Exterior
Check exterior paint for defects. Be sure it is the correct color and that all surfaces are evenly covered.
Check to make sure all gutters and downspouts are installed.
Be sure there are no cracks in the garage floor, driveway or patio
The Complete Guide For Home Inspections
A home inspection is a cheap way to determine the universal value and condition of a home. If a home is not a top shape, the inspector will explain why the home is not worth buying.
Pre Purchase Inspection Options
There are several home inspection options that can be conducted before a home is purchased. Though, the most important service is a general home inspection. During a basic inspection, a certified inspector inspects the interior, ventilation, insulation, plumbing, and every electrical socket. After the inspection is complete, the inspector will provide a report that has suggestions about improvement and repair recommendations. In most cases, an inspection will reveal issues that may be too expensive to repair.
Pre Purchase Inspection Advice For Buyers
Although professional inspections are valuable, you can also tackle a few inspection tasks alone.
Foundation
The ceilings and walls in every room should not have any cracks or shifts.
Attic
Ensure that there are no signs of leaks in the interior of the attic.
Basement
The basement should not be damp, but it should have adequate insulation. If the home has a crawlspace, you should let a professional inspect it.
Electrical
All switches should be operational; when you test the outlets, ensure that they are grounded.
Common Problems Found During Building Inspections
If you want a thorough inspection, you must hire a qualified home inspector. Though, if you understand what to look for, you can take helpful notes during the evaluation.
Building Inspections – Water Damage
Water damage to a structure leads to rot and mold. If water drains toward the building, the crawlspaces will become wet or damp. As a result, settlement, foundation movement, and cracking will occur. If the water moves up the foundation, the walls will rot. A building usually has foundation movement when the windows are not centered, when the interior doors have gaps when they are closed, and when the floors are not level.
Property Inspection Mistakes Made By Buyers
Newly constructed homes must be inspected. Most people think that a new home has already passed all ordinances and local codes; however, many new homes are not in good condition. An inspector can find any major defects that could reduce the home’s value in the future
Sure Thing Home Inspections
Having your home inspected during the COVID-19 pandemic.
We at Home Inspections are taking this warning very seriously. We want to communicate with our agents, clients, and employees on the steps we are taking and what you can expect from your inspection.
Rest assured that our Buford home inspectors are experienced and certified professionals who will report all details, either good or of any concern to you in our reports. Our inspectors are wearing gloves, masks, and shoe covers during the inspection as well.
Should I (we) attend or not?
Due to COVID-19, we know that folks may be hesitant to attend the inspection and we certainly understand. We will be more than happy to call at the end of the inspection and do a walkthrough with you, as well as answering all of your questions
We will have the report (home inspection) out to you by the end of the day or before 8 PM. There are exceptions, however, they are rare as we do our best to deliver the inspection report to everyone as quickly as possible. Although we normally encourage attendance, during this time we ask that if you wish to attend, please bring a mask and gloves to wear with you at all times. This will help to prevent unnecessary exposure for yourself, our Buford home inspectors, and/or the occupants of the home.
home inspection reports are designed to provide a wealth of information, along with photos that will help share our findings with you. We will provide you access to the inspector via email, or you may contact our highly trained office staff after the inspection, should you have further questions.
Home Inspection Tips: What Real Estate Agents Need To Know
As a real estate agent you have the responsibility to educate your clients regarding the importance of home inspection. As a real estate agent, you also have to know the things that you need to know regarding this activity. This way, you’ll avoid home inspection nightmares
Here are some tips that you can share with your clients later on:
1. Understand the job of home inspectors – knowing that homes must be inspected is not enough. You should know what these experts really check when they inspect a house. What are they looking for and what are the most common problems do they identify?
2. Understand inspection reports – depending on where you are and on the company that was hired to do the inspection, reports may come in various forms. So you really need to familiarize yourself with the terms, abbreviations and jargons used in this industry. Know the basic information that must be included in the report and what information may be disregarded.
3. Not all inspectors are the same – not every inspector will do the same job the same way. There are some who may notice certain problems in an area of a house while others may not notice anything. Over time you’ll have someone you’ll prefer but avoid recommending anyone to a client. Instead, give them at least 3 to 5 excellent inspectors that you know of.
4. Make your clients understand home inspection – some buyers think that they can back out from the contract if a home inspector finds that the faucet is not working well. This is not always the case. They have to know what they will lose if they back out from the contract. You have to make them understand why a home inspection is made and how it can benefit them.
5. Checklist – by giving your clients a checklist, you somewhat give them an idea what is going on instead of just waiting for the result. You should also inform them about the basic questions they may want to ask, the deadlines and time frame of the entire process.
6. Encourage them to be there – it’s better that they also see first-hand the problems that the inspector saw in the house. By attending the inspection, they would also be able to ask some questions and get answers immediately.
7. Don’t follow the inspector around – stay out of the way of the inspector to reduce your liability. Also, you are not a qualified inspector so it’s better to stay outside and wait for him or her to finish the job.
The reality is that you may be called upon to make concessions in your sale price due to a home inspection. More often than not, this is the result of a home inspection. Even items that don’t seem terribly important to you can be an issue with a lender. Mortgage lenders are notorious for finding fault with the slightest items on a home inspector’s report. This is an important point to keep in mind whenever you sell a home and whenever you consider your potential cost of making a sale. Sellers always have costs involved in making a sale, including marketing costs such as placing ads, and also a real estate commission when the home is listed with an agent. But other costs to consider are those associated with issues that a home inspector has found or will find when an inspection occurs.
Home Inspection Guide
Looking to buy a property! Get a professional home inspector before you take a decision to buy a particular property. A home inspector can tell you whether the house you are buying is in need of repairs or does it has any construction or mechanical anomalies that need to be taken care of. If these anomalies can be a cause of safety concerns your home inspector should be able to tell you so.
A home inspector usually will put out a report and nowadays there a variety of home inspection report software available which are used by the home inspector for producing such reports. These reports are very exhaustive and cover every conceivable facet of the home you could think of.
When you are buying a home, it has now warranty hence it is up to you to make sure that home you are buying is not in need of major repairs. Once bought you have no recourse but to take undertake the repairs yourself and bear the cost yourself. In fact, if you already own a house and want to do home improvement then it is always better to seek the help of a home improvement expert. That way you are sure that going for home improvement you are actually not disturbing any other element of the construction as well as design.
There is another way to protect yourself from unknown and unforeseen repairs, which is called home warranties. These warranties can cover the most of the costs related to the plumbing system, airconditioning as well as the heating system. Home warranties can protect you from incurring additional unwanted expenses when you are already on a tight budget. In fact, all those costs which are not covered by insurance are covered by home warranties
Home Inspection Report Software – Essentials
In this advanced age of information technology, a home inspectors best friend is a home inspection report software. There are several inspection software programs available in the market offered by several leading companies. Some of the report software is freely downloadable as well.
Planning for your business takes a lot of time and effort. Indeed, it’s a great day when you can plan for the months ahead while also staying on top of the many details of your day-to-day operations. Every day requires that you listen to your customers, ask the right questions, make risk assessments, and put out fires any fires that may spark. The pressure can seem enormous at times, but you come back and do it again each day without fail. And yet, despite your incredible competence, there’s a chance that you still have that old adage that even “the best-laid plans of mice and men often go awry” in the back of your mind. The fact is, businesses are run and staffed by humans. Even if you have a loyal group of skilled employees who work hard and a stream of satisfied customers, problems are still possible, and a wise business owner knows this and prepares for whatever may come up.
So, what do you do when running your company isn’t just business as usual? Do you have contingency plans for issues that arise during your busiest times, or for when employees call in sick, or for when you encounter paperwork headaches? Chances are you do, and this same attitude should apply to your business’s finances as well. Accounting and tax preparation can be complicated and time-consuming, and you may find yourself muddling through it long after you’ve sent your employees home for the day. This can lead to fatigue-induced mistakes, and when it comes to money, this isn’t a chance you should take. In fact, it’s the primary reason you should consider why outsource your accounting and tax preparation services.
Listed below are seven reasons why CPAs are outsourcing tax preparation services:
1. Among the primary reasons behind which businesses pay attention to tax preparation services is the expansion of the business. Likewise procuring new clients turns out to be simple when you outsource these types of services. Whenever you outsource tax preparation, you get a longer time to pay attention to the important requirements of the clients.
2. Handling an internal team for these tasks may result in a rise in the operating cost of the firm.
3. Losing clients is the very last thing that a firm expects and when you outsource tax return preparation to the offshore businesses, you can magnify your return by having to pay less. Furthermore, there is no need to lose those valuable clients as it may transpire if you happen to be caught up with crucial tasks.
4. The primal advantage of outsourcing is the fact that you obtain a high-quality job within the allotted time period.
5. Handling an outsourced company to carry out tax preparation for CPA firms is simpler as compared to dealing with an in-house team of accountants.
The top benefits for why you should consider outsourcing your tax preparations.
Save Time & Focus on Your Business
Accounting and tax preparation can be highly time-consuming. By outsourcing your accounting and tax preparation work, including tedious tasks related to bills, payroll, mandatory declarations, and other ancillary issues.
This saves you a lot of time because as a busy entrepreneur, you get to focus on other aspects of your business and find ways to generate more income and grow your business.
No Tension Regarding Tax Laws
Tax laws and legislation are always changing, and it is challenging for an accountant or tax professional, no matter how good he or she is at the job, to stay up-to-date with them.
The outsourced accountant is always a step ahead when it comes to their knowledge about the tax laws and legislation. As far as the accountant is concerned, he or she can take it easy and focus on doing their job without having to worry about missing out on any local tax incentives.
Best Accounting Software
Not using the best technologies at work is detrimental to an accountant’s career. A lot is at stake because he or she is dealing with sensitive information. Tax preparation outsourcing for accounting firms will make sure the most recent version of the tax and accounting systems is used since the outsourcing provider will support them with the latest technologies.
Reduce Costs
Many companies have made the mistake in hiring and training too-green bookkeepers or accountants for the low cost and high convenience. By outsourcing, companies save money on expenses related to recruitment, employee benefits, training, accounting software, hardware, and office supplies, so entrepreneurs can focus on daily operations, team management and customer acquisition which are more important for your company growth.
No More Mistakes
If an accountant inputs copious amounts of data into the accounting tools daily, there are bound to be mistakes that could put the accountant’s reputation in jeopardy, and cost his or her clients big bucks. Tax preparation outsourcing for accounting firms keeps such worries at bay as they typically deploy a two-step review system to ensure the job is completed with 100% accuracy.
Take the hassle out of dodging SARS because you keep delaying and postponing your tax preparations because you are unable to find the time to do them. Take the initiative to do what is best for your business and outsource. It not as difficult as you may think it is.
Here are reasons on Why you should outsource tax filing & preparation.
One of the real reasons behind which organizations concentrate on bookkeeping and tax preparation services is the development of the business. Additionally, securing new customers turn out to be simple when you outsource these services.When you outsource tax filing preparation services, you get more opportunity to concentrate on the important needs of the customers.
You don’t need to approach quality staff in your office and recruiting staffs and delegating work can be much more troublesome. Rather than getting into such problems, outsourcing these undertakings is more advantageous and helpful for the business.
Losing customers is the last thing that a business expects and when you outsource accounting and tax preparation from the organizations, you can twofold your income by paying less. In addition, you don’t lose those valuable customers as it may happen if you are distracted by basic undertakings.
Good oral care is just one of the many responsibilities that come with being a parent. Children’s teeth, compared to adult’s teeth, are more prone to cavities and fractures. That’s why it is a must that parents bring their children for dental check-ups at least twice a year. When children are already experiencing tooth pain even before they have visited a dentist, it makes it harder for the parent to convince them to have someone else look at their teeth. Their fear of adding more pain to what they already have hinders their ability to trust the dentist, especially with all the odd looking tools and scary sounds they hear in most dental offices.
Pediatric dentists are not that different from general dentists. They have the same medical degree and the same professional responsibilities. The only thing that sets pediatric dentists apart from general practice dentists is the certification training they have gained on how to deal with children, which for a parent may mean everything. They also study different procedures and techniques such as conscious and deep sedations that are applicable to treating children with autism. Pediatric dentists are strongly recommended for children with ADS, since they are familiar with the symptoms of the illness and they are trained in how to manage children with autism in order to complete necessary procedures.
Here are some points to remember when choosing the right pediatric dentist for your child:
Qualification and Certification
Please keep in mind that the pediatric dentist you choose to care for your child’s dental health should have completed a course in Pediatric Dentistry from an accredited institution.
Active License to Practice
The pediatric dentist should have a license that permits him or her to practice the said dental profession in your state. Professional dental licenses are approved and given by the state board. Usually certifications and licenses of dentists are displayed in the reception area of a dental clinic. If this is not the case do not hesitate to ask the dentist about it.
Good Behavior Management Skills
It is known that children with ASD possess disrupted communication and social skills. You need to find a dentist who has strong behavior management skills. A dentist that greets your child with a big, warm smile would be a good start. Pediatric dentists are specifically trained to use communication that is built on a dynamic process of dialogue, facial expression, and voice tone. A good example of a therapeutic interaction from your dentist to your child would be the dentist allowing the child to observe how the dental chair goes up and down, without the child having to sit on the chair yet. In this manner, the dentist is addressing your child’s fear. Pediatric dentists should not be aggressively forceful especially on the first dental visit.
Know The Difference Between A Pediatric And Family Dentist
Family dentists are general dentists and they provide professional dental care to patients of all ages, not just children. Pediatric dentists, on the other hand, must undergo 2 more years of specialized training and be board-certified by the American Academy of Pediatric Dentistry. They work exclusively with children.
If you want to find a pediatric dentist near you, you can check out the AAPD’s search tool here. You may also be able to get referrals and recommendations from family and friends, or your general dentist.
Take A Look At Online Reviews
Once you’ve identified a few nearby pediatric dentists, we recommend taking a quick look at the online reviews for each one. Online reviews are generally a good way to get an idea of what you can expect from a particular dentist, and provide you with a lot of valuable information about their services, bedside manner, and how well they work with kids of a particular age.
Schedule Consultations With Each Pediatric Dentist
Pediatric dentists are happy to schedule consultations where you and your kids can meet the dentist, visit the office, and learn more about what they do. During this time, no dental work will be done. You’ll just have the opportunity to visit each office, talk to the dentist and the staff, and learn more about the practice.
You can also see how child-friendly the practice is. A great pediatric dental office will cater to children with toys, books, fun colors, and a relaxed atmosphere that helps your child stay calm and entertained before, during, and after their appointment.
Ask for Recommendations
To start the process of finding the right pediatric dentist in Raleigh, you may want to ask other mothers or friends about the dentists they use. You can also ask your pediatrician and/or family doctor for recommendations.
Call and Ask Questions
Prepare a few questions and call the pediatric dentists you are considering. A quick phone interview can help you determine which dentist would be best for your child. Common questions to ask include how long they’ve been in business, their pediatric specialties, how long it takes to schedule an appointment and what types of insurance they accept. If you have a special needs child or a child with learning disabilities, you may want to ask the dentist if they accept children with special needs and what steps they take to ensure the child is comfortable and relaxed.
Good knowledge of dental equipment
When you take a tour of the dental clinic, make sure you check up on the pediatrician as well. You should check if the dental clinic has all the necessary dental equipment or not. If your autistic child is in need of any kind sedation, they should be able to provide that. Some of the common things that your ADS suffering child will be requiring include oxygen tank, papoose board, pulse oximeter and more.
Don’t assume general dentists are best for your child
Pediatric dentists go through two extra years of residency training after dental school. This makes them especially qualified to provide pediatric dental care. General dentists don’t have this same level of training to work with children. As a result, they may not be able to explain dental procedures in a way that’s easy for your child to understand.
Your child’s first impression of the dentist is important. A bad first experience could make your child afraid of the dentist. Our pediatric dentists give your child the tools they need to maintain a healthy smile for life. You should especially choose a pediatric dentist if your child has anxiety or other special needs.
Choose a pediatric dentist close to home
We recommendchoosing a new pediatric dentist that’s close to home or your child’s school. That way, you won’t have to travel long distances for a dental emergency or in bad weather. It’s much more convenient to have your child’s dentistlocated nearby.
At the same time, it may be worth it to you to drive a bit farther to get your child the quality dental care they need. As the parent who’ll be responsible for taking their child to the dentist, it’s up to you.
How to Deep Clean Your House: Complete Room-By-Room Guide
Whether you’re hoping to do a big spring clean or overhauling your home at any time of the year, there are some great tips for deep cleaning in every room of the house.
You’ll be surprised by all the places you may not have considered adding to your cleaning list, but you’ll definitely be glad you’ve added them.
Deep cleaning your house may sound daunting and you might fancy enlisting the help of your local cleaning company, but bear with us.
We’ve pieced together these great steps to getting your home spotless – whether that’s before guests come to stay over in the holidays or just because you’re sick of seeing the same dust on that window sill and the same stain on the bath – so you can take it in your stride, knowing what needs to be done next.
Why Should I Deep Clean My House?
Having a clean house is quite important, not only for aesthetics but for the health of yourself and anyone living with you. Cleaning gets rid of dust, dirt, mould and grime which can all cause illnesses if left too long.
COVID-19 Deep cleaning guidance in Care Homes
Deep cleaning is a more enhanced programme of environmental cleaning, which compliments the routine daily cleaning in a care home. It includes the thorough cleaning of all surfaces, floors, soft furnishings and reuseable equipment either within the whole environment or in a particular area, e.g. resident’s room.
The guidance includes information on:
Colour coding
Equipment required for a deep clean
Handling waste during COVID-19
Procedure for a deep clean of a resident’s room
Tips and tricks: A guide to deep cleaning your fridge
With summer just around the corner, now is the perfect time to refresh your home and get stuck into the tasks you’ve been avoiding. Get started now so you can enjoy the great weather scheduled ahead, making the most out of the spring showers that currently prevent you from heading outdoors. There’s no need to rush or clean everything at once – you don’t want to get overwhelmed, after all. The best way to get started is tackling one element of the room at a time. Here, we look into how to clean your fridge.
Getting started
Worried about not having the kit you need to clean? Well, you may well already have it all anyway – and it’s important to stress that you don’t have to go out and buy lots of things to carry out this task. Black refuse bags, antibacterial cleaning spray, sponges, paper towels, bicarbonate of soda and, ideally, a cooler to keep your food in while you clean are all you need.
You can actually make your own natural cleaning products, if you want to go down the eco-friendly route. You may, for example, need to get rid of any nasty stains that cause lingering smells in fridges – and you can do this with a mixture of baking soda and vinegar. We’ll explain more about this later.
Fridge cleaning tips
There’s more to cleaning a fridge than just chucking out your old food, although that is a good starting point. If there’s a lot to throw away, aim to do this not long before bin day so that your food waste doesn’t sit waiting for too long.
Sort through your food and empty your fridge
Start by going through all of the items in your fridge – you may be shocked at what’s lurking at the back. The golden rule is that if it’s out of date and inedible, throw it away. Some items that are close to their sell-by date can be frozen instead, so do double check before you purge your fridge.
Guide to home and office cleaning during the coronavirus (COVID-19) outbreak
To reduce the risk of coronavirus (COVID-19) infection, more frequent cleaning is recommended in all properties, including those with no confirmed cases of coronavirus. When cleaning, extra attention should be given to ‘high-touch’ surfaces such as door handles and light switches.
If there has been a confirmed or suspected case of coronavirus in a property, it is recommended that the property is deep cleaned and disinfected to reduce the risk of transmission to other people.
How to clean: When there is confirmed or suspected coronavirus
If there has been a confirmed or suspected case of coronavirus in a property, the following steps should be taken to clean and disinfect the property
Find out when the property was last contaminated with coronavirus
A study has shown that coronavirus (COVID-19) is stable for two to three days on plastic and stainless steel surfaces. Therefore extra precautions are recommended throughout this guide if the property was exposed to coronavirus within the last 72 hours
If there is a person in the property with suspected or confirmed coronavirus, this person should be isolated to a single room while the cleaning takes place. This person should also use their own bathroom if possible. Unless needed, these rooms should not be cleaned until this person has completed the required isolation period. If a separate bathroom is not available, this person should clean and disinfect the shared bathroom after each use
Coronavirus: Deep Cleaning Tips for Holiday Rentals
Providing a safe and clean property has always been one of the highest priorities for holiday let owners and managers. It’s now more important than ever to re-evaluate your cleaning procedures and take measures to clean and disinfect your rental to protect yourself and your guests.
It’s essential to regain the trust of travellers that you reassure them that your holiday rental will be correctly cleaned for their stay. From disinfecting to using the right products and step-by-step cleaning guidelines, here are some coronavirus cleaning tips to help protect your cleaners and guests during COVID-19 and beyond.
COVID-19 is still a relatively unknown virus and how the virus lives on surfaces is yet to be fully understood. It’s possible for someone to contract COVID-19 by touching a contaminated surface – like a door handle or light switch, and the virus may live on some surfaces for several hours or even days.
It’s likely that your cleaner(s) will be the first ones to enter your property after the last guests depart, so it’s essential to protect them with the right equipment and procedures so they stay healthy. Share information on how they can protect themselves and keep them updated on the latest Government safety advice, so they know you are looking out for their wellbeing.
Here are some recommendations for your cleaning crew:
Cleaners should not work at all if they have symptoms of COVID-19.
Ensure cleaners are working to the government social distancing guidelines if working as a team.
Cleaners should wear face masks as it’s possible that they are contagious but not experiencing symptoms. They should also wear safety glasses, shoe covers, aprons, gloves and avoid touching any uncleaned surfaces then touching their face.
They should wash their hands immediately on arrival (following the correct procedure for handwashing) and immediately after gloves are removed. If that’s not possible, hand sanitiser should be used.
Make sure your cleaners know how to safely remove any cleaning gear, dispose of it or sanitise accordingly after use. PPE items should be changed between cleans.
Bats are flying mammals that serve a very useful purpose: they eat enormous quantities of insects. In the summer, they can find their way into homes—typically in roof eaves, in crevices around the roof covering, in the attic, or under siding—where they roost in large groups called colonies. They can enter through an opening as small as 6 mm wide. Bats usually settle near a body of water
Do not let them take up residence anywhere in your home—not even in the attic. The presence of bats, their feces (commonly referred to as guano) and urine, as well as the parasites they carry, will result in unsanitary conditions.
A further concern is rabies transmission: a very rare occurrence, but still a possibility. In the evening or at night, when bats are active, one or two may involuntarily find themselves inside your house. If this happens, they must be got rid of.
Are bats useful or bothersome?
A single bat can devour thousands of mosquitoes and other insects in one hour.
Their activity allows for reduced use of insecticides in farming areas and, in turn, less ground and water pollution.
Bats are natural eliminators of stinging and biting insects that are recognized carriers of diseases like West Nile virus, Lyme Disease, etc.
If a single bat is loose in your house:
Before you begin, put on a pair of leather work gloves.
Open doors and windows and wait for the bat to fly out on its own. If the bat is there in the daytime, leave all indoor lights off; the bat will leave when night falls.
If this doesn’t work, try to capture the bat and release it outside.
The Ultimate Repellent Guide: How to Get Rid of Bats From Your Attic or Household
You’re here because bats in your household are giving you headaches, right? That’s bad news, but we’ve got some good news for you now: after reading this article you’ll know exactly what steps you need to take to make this problem a thing of the distant past. This guide is suitable for you if you’re looking for information on how to get rid of bats in your attic without incurring thousands of dollars in removal costs. On our website, you will learn the different methods that we and other professionals use to get rid of these foul beasts safely and efficiently.
Whether you’re a D.I.Y kinda guy/gal, or just want to get the professionals in to remove your little flying friends quick-smart, the following information will guide you in the right way. Click the links in the table of contents to jump to the correct section
Bat Facts – What You Need to Know
Bats are winged mammals most commonly known for their habitation of caves and consumption of various insects over the course of the night. These animals, many of which are either threatened or endangered depending on the species, provide a great deal of color to the nig
Where Do Bats Live? (when not in your attic or home)
Bats most commonly roost in caves, which provide a safe, enclosed area for them to sleep and raise their young. But they don’t always utilize a cave. Mexican free-tailed bats, for example, can create a roost in almost any environment provided it is dark and shut-in. This flexibility in habitats means that your home could be at risk for a colony invasion. And since a bat colony can contain anywhere from 40 to twenty thousand bats, the damage done to your home can be extensive.
Evidence That You May Have Bats In Your Attic or Home
Bats seek the safety of dark, enclosed areas like caves to raise their young, called pups, However, when a cave is not available or overpopulated, bats will turn to the household attic because it most resembles a cave. An attic may even have some advantages over a cave because of the reduction in predators and the advantage of height. If you want to learn more how to remove the bats yourself (DIY)
Bat in Your House? Here’s How to Get it Out.
You’re watching TV or making dinner when you hear the flapping of wings. Imagine your surprise when you discover it’s not a bird — but a bat that’s found its way into your home! Nobody likes uninvited guests. But compared to common pests like flies, ants or mice… a flying bat circling above you is universally spooky. That’s because these winged creatures have developed a reputation as disease-carrying pests out to infest your home.
Here’s the truth: Despite their prominence in horror films and Halloween decorations, bats are actually beneficial for the environment. In fact, bats are crucial to insect control, pollination and seed dispersal. And according to the Centers for Disease Control and Prevention (CDC), less than 10% of bats tested for rabies are actually infected.
HOW DO BATS GET IN THE HOUSE?
A lost or curious bat can fly into your house through open windows or doors. If that’s the case, odds are it’s looking for a way out. But a more common reason bats invade your living space is to find a place to have babies in the fall or spring. Whatever the time of year, bats can sneak in through an entry point as small as 3/8 of an inch wide. This includes gaps in your siding, roof or soffit, as well as chimneys and attic vents. And if they make themselves at home, there’s no limit to how long they’ll stay.
HOW TO GET RID OF A BAT IN THE HOUSE
Whether you have a rogue flyer or a momma bat in the attic, use these bat removal tips to help it get back outside — and out of your living room:
Wear the proper protective gear. When handling a bat, never use your bare hands. Wear gloves (thick leather gloves are best), clothing and even a mask to protect yourself from bites. Bats aren’t typically aggressive, but it’s always best to play it safe.
Keep calm. When trying to remove a bat from your home, do your best to stay calm. Avoid making loud noises (like screaming, “There’s a bat in my house!”) or chasing the animal. It’s also a good idea to remove any pets from the room. An excited or panicked bat will be more difficult to catch.
Trap and release. The easiest way to release a bat back into the wild is to trap it in a box or container. Start by waiting for the bat to land (likely a place it can hang). Quickly place a plastic container or cardboard box over the bat. Then, slide a piece of cardboard or thick paper under the box and release the bat outside. When releasing the bat, try to let it go near a tree so it can climb (most bats can’t take flight from the ground).
Contact a local professional. Bats are a protected species in many states. If you aren’t confident in handling the situation yourself, contact a local pest control specialist for help. This is one of the safest options, too, especially if your bat problem persists
IS A BAT LIVING IN MY HOUSE?
Bats prefer to roost in high places, like attics, chimneys or porch ceilings. Bats are typically quiet animals, although you might hear squeaking or scratching noises when they’re on the move. The telltale sign of where bats are roosting is their droppings – they look like mouse droppings, but larger. You might also find rub or scratch marks at the point where they enter your home.
How to Get Rid of Bats that are flying in your living space.
Step by Step Guide.
If you are certain that there has been no contact with the bat, here are the steps to follow to get it out of your home.
Step 1 : Isolate the bat. Close doors and the other parts of the house, possibly even putting a towel on the ground to prevent the bat from crawling under the closed doors if there is a gap.
Step 2: Open a door or window as close to the bat as possible. The bat is lost and wants to get out of your home where it can find food and water. It also wants to get away from all the scary humans. It will eventually (could take up to an hour sometimes) sense the fresh air movement and fly outside.
Step 3: Turn off anything that makes noise. Loud noises often confuse bats’ echolocation systems. Turning off anything that makes noise will go a long way in helping the bat to find its way out.
Step 4: Keep an eye on the bat. Many hours can be spend searching in the house/room for the bat if it goes into hiding. When it does fly out, it will be sudden – and quiet. It may circle the room from time to time before it discovers the open window.
Step 5. Removing the bat. If the bat does not seem to be exiting the room on its own or you are feeling impatient, you can attempt to capture the bat and release it outside. It is a good idea to wear gloves and long pants when attempting to capture the bat.
Here are a few methods.
Throw a towel over the bat. Once the bat is under the towel, scoop it up, making sure to wrap the bat inside. Be sure not to crush it!
Place an empty laundry basket or wastepaper basket over the bat. Then take a newspaper, magazine or other similar object and slide it between the wall/floor and the bat. Make sure not to pinch the bat.
Use a small-meshed net to capture the bat. ( A large-meshed net may capture the bat as well but it may injure it as the bat will likely become entangled in the net and require you to use a more hands on approach.
Step 6: You will hear a clicking noise which means that the bat is scared and may actually attempt to bite. Once you have the bat inside the towel or a container, bring it outside, some distance from the house. Make sure that any doors or windows are now closed. Remove the towel or newspaper and turn the container on its side. The bat should be able to get out and fly away.Keep in mind that it is not easy for the bat to take off from the ground, so if possible, push the container or towel as close to a tree as possible.
Whew, the bat is out of my house. How do I ensure that it stays out?
Usually the first time you have bats, there is a slight chance that they have entered from an open door or a window and it can be dismissed as an one-time event. But if it happens repeatedly, then we can safely say that you have some bats living in your home.
Best Way To Get Rid Of Bats
Many people have a great fear of bats. After all, they are mysterious, scary looking and can transmit rabies. If that’s not enough, we also watch scary movies about blood-sucking vampires to increase our fear of bats. The good news is that vampires are not real, however, vampire bats are quite real, and they do suck blood from humans. With that said bats are still quite misunderstood and they are considered to be an essential part of our ecosystem. Here is everything you need to know about them, and the best way to get rid of bats when they become a pest.
About Bats
Bats have a very unique skeleton and are among the most diverse vertebrate groups in the animal kingdom. With more than 1300 species (Fenton and Simmons, 2014), bats make up a fifth of all mammals on the planet. Although bats vary in size and color, they all belong to the mammal order Chiroptera, which means “hand-wing.” and are the only mammals that can truly fly.
As with other mammals, bats are warm-blooded, covered with hair and give birth to live “pups” that drink milk from their mothers. Bats can further be classified into different groups based on size (megabats and microbats) or by what they eat. Most bats are insectivores (insect eaters) or frugivores (fruit-eaters). A few species feed on animals other than insects; for example, the vampire bats feed on blood.
What Do Bats Look Like?
Bats are usually described as looking like a rodent with wings. A bats wing is similar to a human hand. Instead of a thumb, they have a strong claw that they use for grabbing and climbing. The rest of the long fingers are attached by a thin layer of skin or wing membrane that stretches between each finger of the hand all the way to the leg which allows them to fly.
What Is A Bats Lifecycle?
Females will roost to give birth to young usually in a cave, tree, abandon building or attic space. An adult female bat will usually only have one pup during a birthing period and may give birth up to three times per year.